Mind Blowing 3D display at home
Transforming my Living Room TV into a Mind-blowing 3D display

PS: Co-authored by ChatGPT (hence, very wordy).
Project Description
Amidst the pandemic, many of us adjusted to working from home. In search of a captivating home entertainment experience, I transformed my living room TV into a mesmerizing 3D display. Inspired by the desire for immersion, I started exploring the world of real-time perspective correction. I built an app that tracks me in my living room, and accordingly renders a 3D scene on my TV, for my own viewing, with the correct perspective that matches my position to create an optical illusion. Basically, an exercise of building a real-time forced perspective mechanism.
The app uses computer vision and a webcam to detect humans, isolate their figures, and extract body positions in a 2D space. This data is then transformed into a three-dimensional representation of the user’s position in the room. By mapping the 2D body position to a virtual 3D space, the app provides an immersive experience by accurately locating the user’s head within the living room. It combines advanced technology to push the boundaries between the real and virtual worlds, enhancing home entertainment experiences.
Once the 2D body position is translated into a 3D representation, a game rendering engine (Unity) takes the 3D points representing the location of the user’s head in the living room and utilizes them to recreate an immersive 3D environment. It meticulously constructs a virtual space that mirrors your physical surroundings, accounting for depth, perspective, and spatial relationships. With careful attention to detail, the software renders this virtual environment, transforming it into a captivating visual display that can be seamlessly projected onto your living room TV. As a result, the user is transported into a mesmerizing realm where the boundaries between reality and the virtual world dissolve, providing an unparalleled and truly immersive home entertainment experience.
From a high level perspective, the application is composed of two executables:
- A docker container running on a Nvidia Jetson Nano that infers the viewer’s position in my living room, and serves that to a downstream client as a JSON reply.
- The client (Unity in this case), queries the API once per Frame Refresh, and uses this information to modify the Scene’s. A 3D object is placed behind the TV, and is rendered.
THe diagram below shows the different components at work, at every single Frame refresh. The Jetson Nano includes the following sub-components:
- A webcam - a Logicom c920 webcam.
- PoseNet - a built-in Neural Network that takes in an image, and returns the location of BodyPose KeyPoints.
- A custom Features Creator moduled (detailed below). The FeaturesCreator transforms the raw data returned by PoseNet to features I use in my application.
- A custom Neural Network, that transforms 2D pixel values of the previous steps, into 3D vector space mapped to my living room.
- A Kalman filter, which I use to reduce the noise returned from my Neural Network.
- FastAPI, which provides a JSON answer to anyone who access / on HTTP.
- A Unity client, in which the Camera’s Position is set to what the FastAPI endpoint returned.
Components
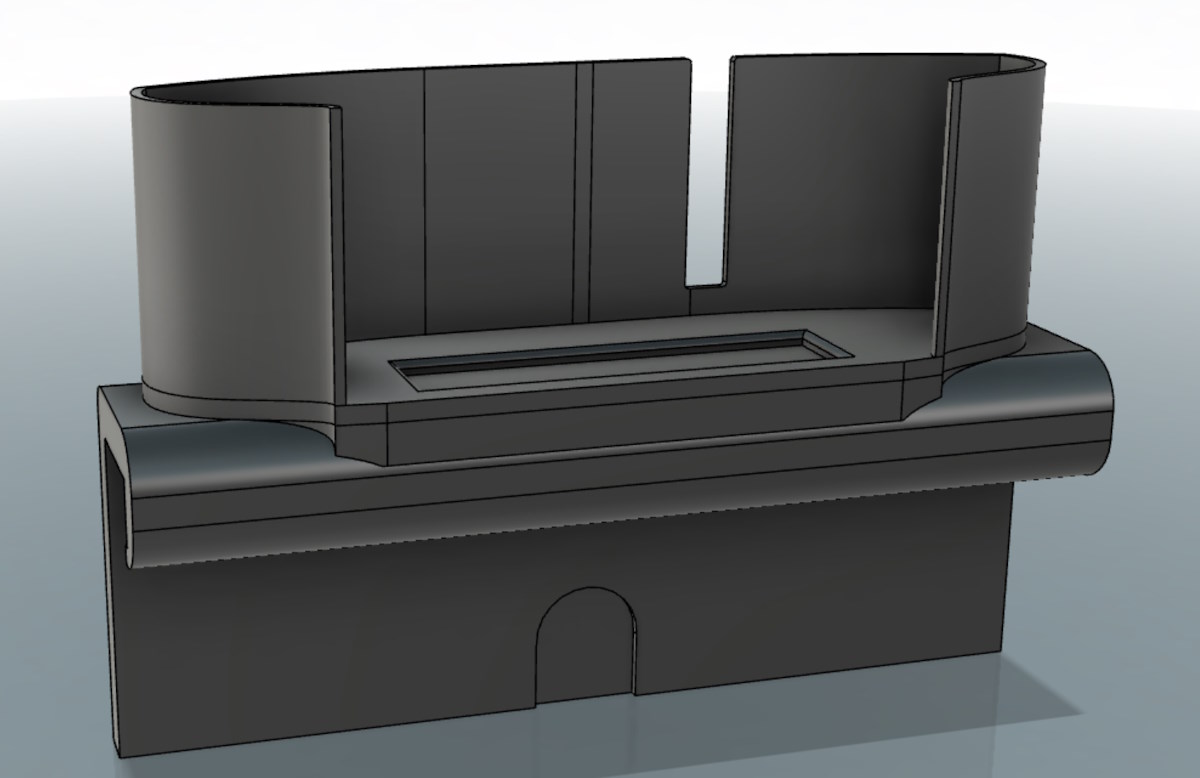
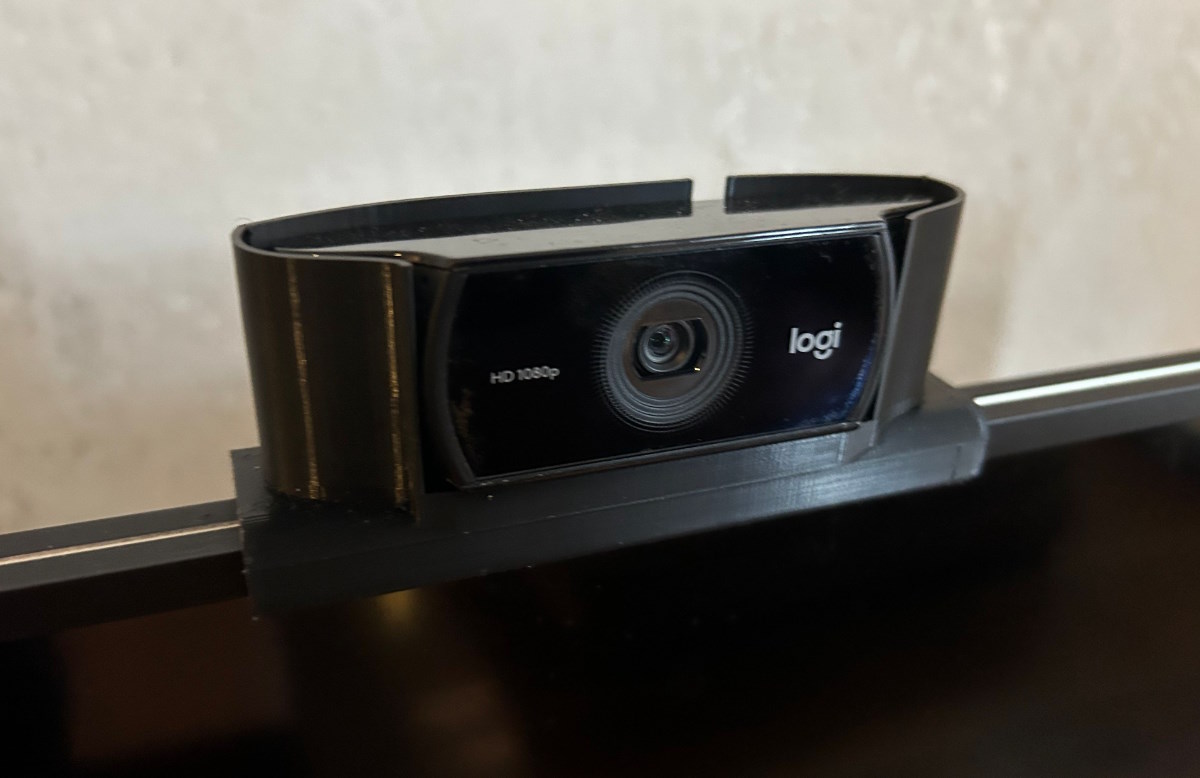
To reduce any downstream error accumulation, I needed first to ensure the camera stays at a fixed point in the room. It was critical that nothing static changes position, therefore the first thing I did was creating a chassis that holds the camera firmly at a specific static point, in my case on top of the TV.
The camera was originally planned to be connected to a Raspberry Pi, but after further consideration and to enable some room to experiment different technologies, the app was built in a Docker container on a NVidia Jetson Nano serving inference data through FastAPI as a REST API. This setup decouples the application components clearly, delineating a responsibility to determine the person’s location from rendering a scene. I was hoping to experiment with other technologies, thanks to this decoupling (for example, try to add a new network instead of the built-in, or use another rendering engine such as unreal, etc..). Unity, a popular game development platform, leverages the REST API to access the inference results, allowing for the integration of the captured 3D body position data into the virtual environment.
The decision to opt for the Nvidia Jetson Nano was driven by the desire to leverage its onboard processing capabilities for running neural networks. This not only streamlines the overall setup but also enhances the system’s efficiency by offloading the processing workload from external devices. Additionally, the Nano’s versatility allows it to serve a dual purpose by utilizing the same device for rendering the scene on the TV. This integration further enhances the synchronization and fluidity of the overall experience, providing a seamless transition between the captured 3D environment and its projection on the television screen.
3D parts
The Logicom c920 chassis was designed in Autodesk Fusion, in an iterative manner, and printed on a Creality S3 Pro V1. With this chassis, the camera was stable and forced to remain in place.
Powering the Nano with an adequate power supply
A note on getting the correct power supply and storage: The Nvidia Jetson Nano relies on a 5V 2A power supply to ensure it receives sufficient power to drive its GPU effectively. Without a suitable power supply, the Nano will decrease the power supply to the GPU, leading to a suboptimal user experience characterized by choppy performance. It is crucial to provide the Nano with the recommended power specifications to enable smooth and uninterrupted GPU functionality. The NVidia forums provide a list of recommended power supplies, as well as instructions to configure the Nano to use the external power supply instead of the 5V USB-C path. In addition to the power supply requirements, it is important to note that the storage SD card for the Nvidia Jetson Nano should not only have a large capacity, preferably above 32GB, but also be fast. The choice of a fast SD card is crucial as it directly impacts the inference time of the system. A high-speed SD card enables quicker read and write operations, facilitating faster data access and processing, ultimately reducing the time it takes for the Nano to perform inference tasks. Therefore, selecting a storage SD card that combines ample capacity with fast transfer speeds is essential for optimizing the overall performance of the Jetson Nano.
NVidia Hello World repository
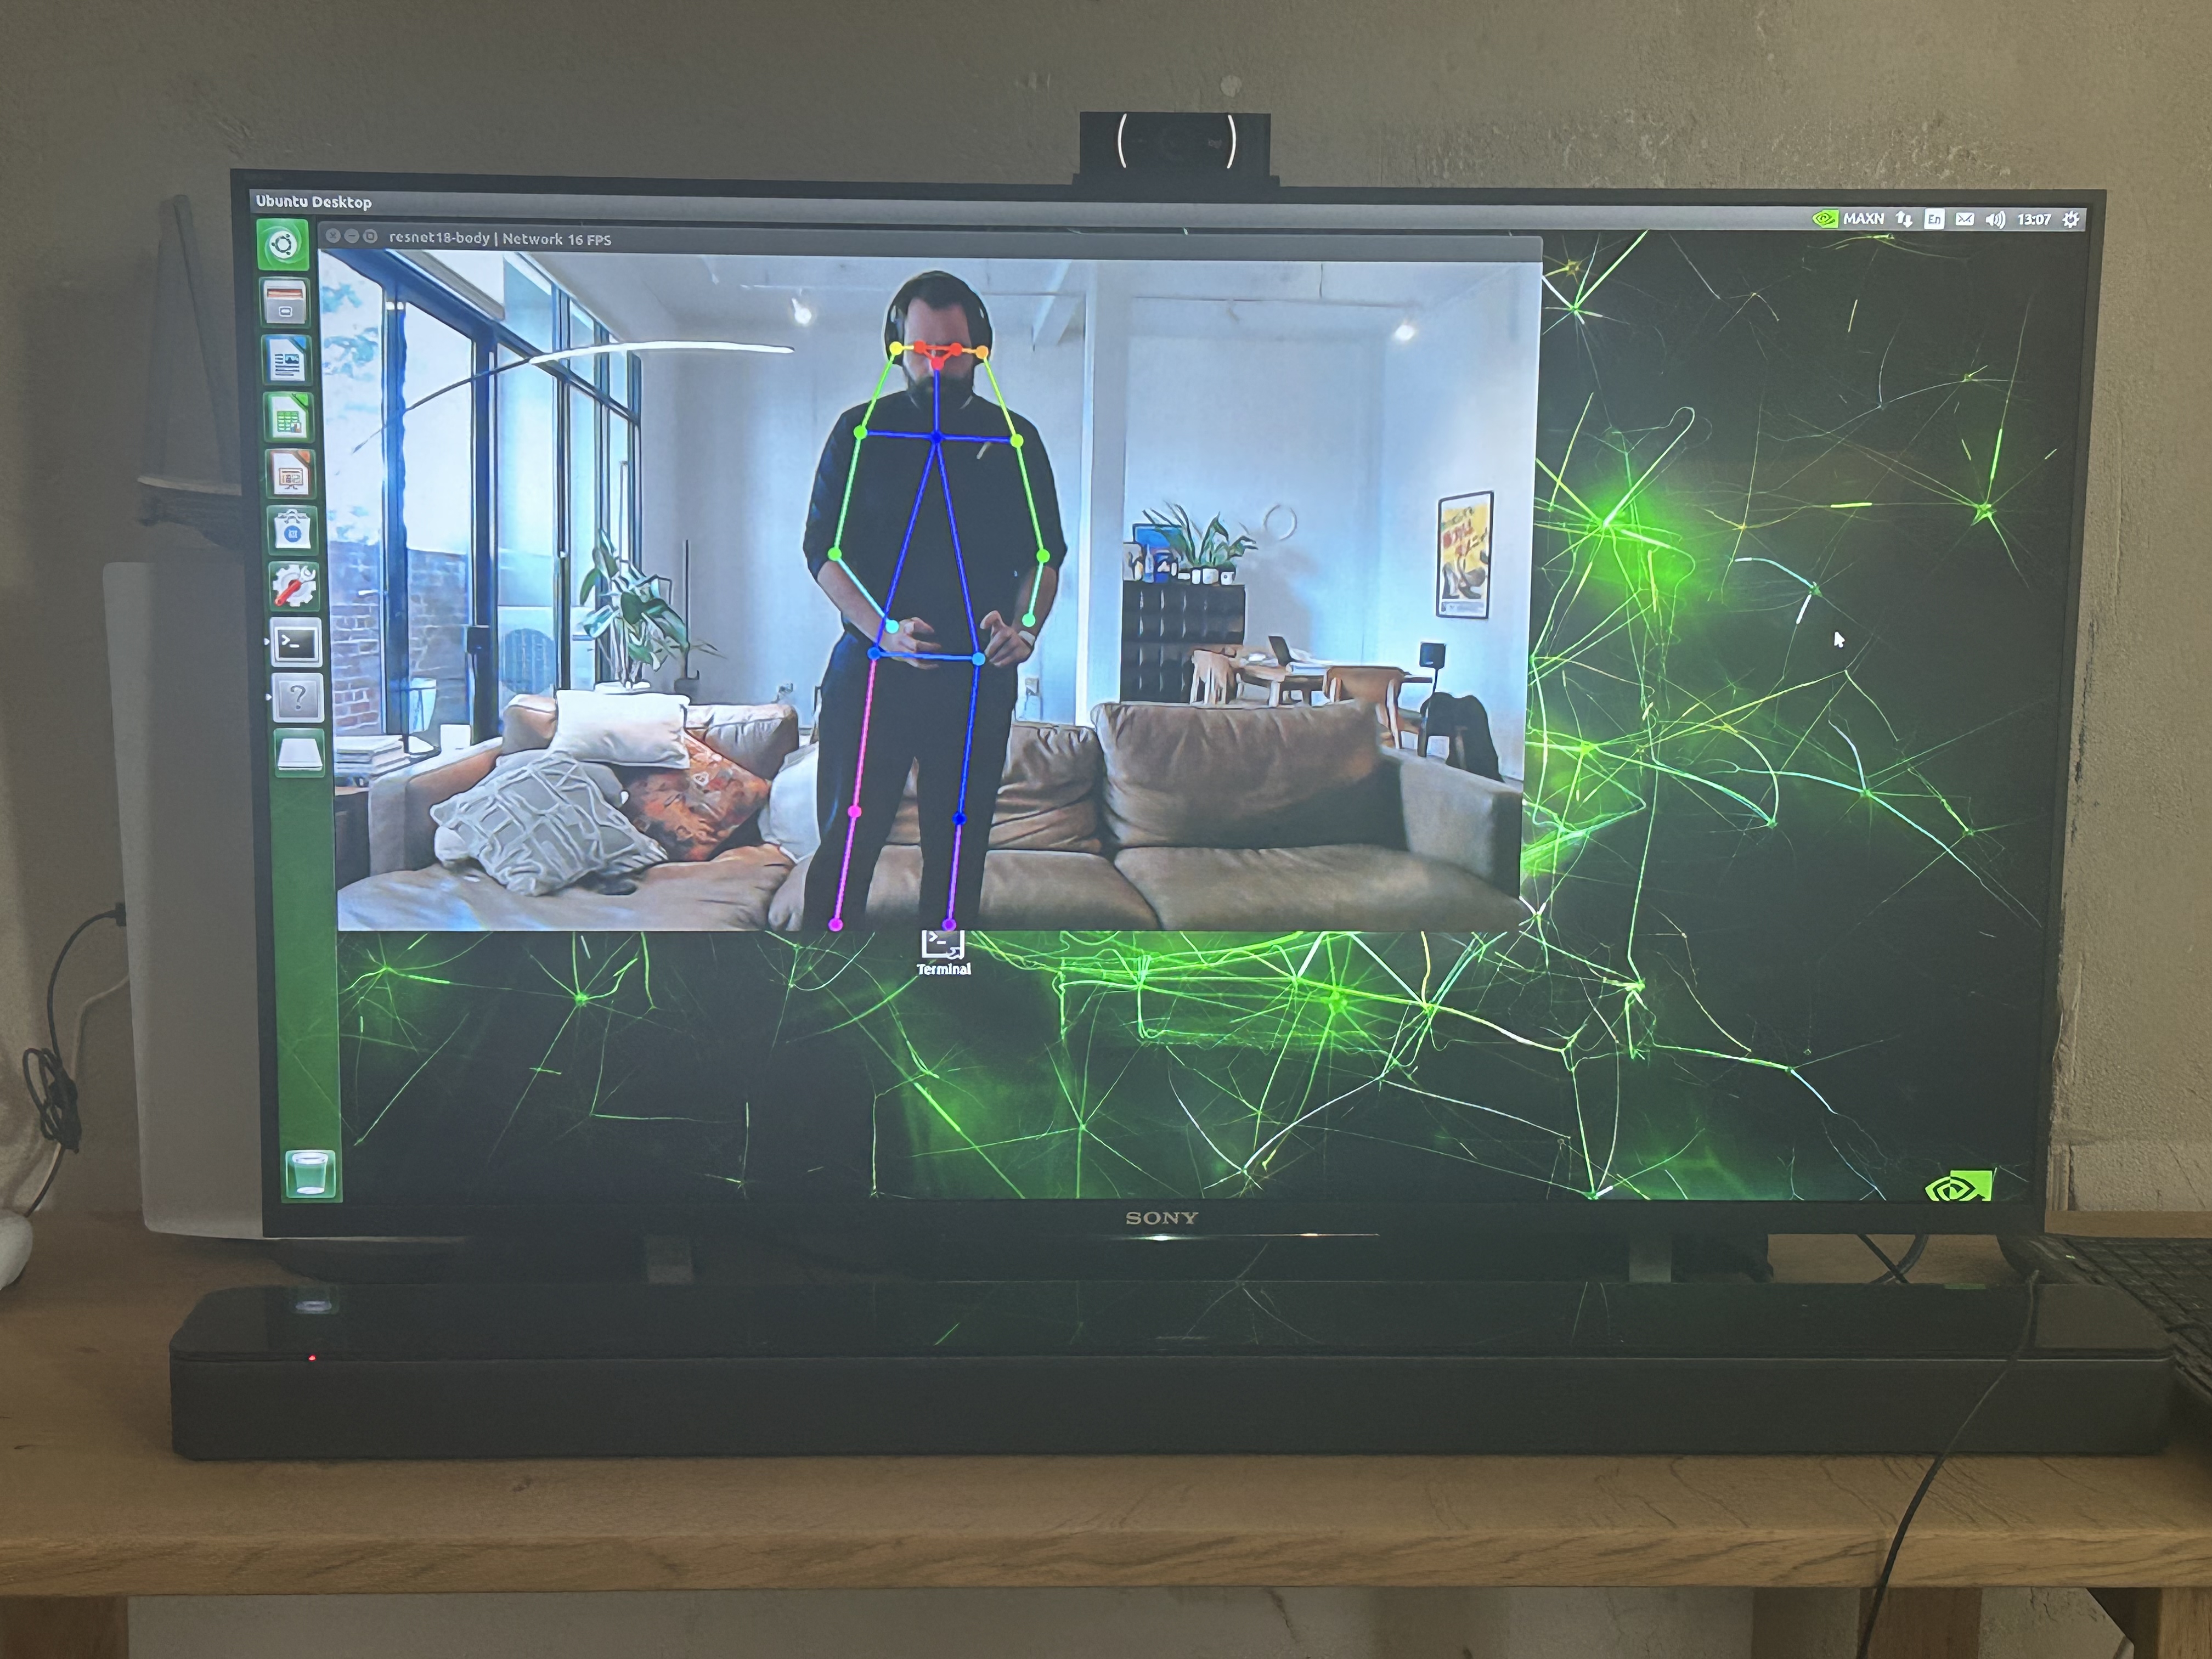
I built my work on the excellent Hello World Nvidia repository. The very first thing I did was a smoke test: I ran one of the built-in networks to validate that it works,. I cloned the “hello world” repository, and ran python/examples/posenet.py with the default resnet18-body backbone network, keypoints overlay and 0.15 acceptance threshold, capturing from /dev/video0.
Setting up SSH for vscode remote + github auth
I configured SSH to work with Github on the Nano.
Creating a new DockerFile to install FastAPI instead of Flask
Once the development environment is ready and a test network was ran, I looked at modifying the Dockerfil incorporating essential modifications and installing FastAPI and some other dependencies instead of Flask. While I initially aimed to leverage VSCode DevContainers for seamless development, I encountered limitations due to the unsupported Python version within the image. However, this obstacle became an opportunity for growth as I delved into the intricacies of debugging, mastering the usage of pdb.set_trace() and remote debugging. This exercise not only enhanced my troubleshooting skills but also equipped me with invaluable insights into optimizing and fine-tuning the software environment for optimal performance.
Calibrating the camera
WIP
Collecting training data
With the Docker container up and running, the next step in my journey was to build the application that will serve as the foundation for collecting training data. THe diagram below shows the high level architecture used to collect training data. It’s very similar to the previous diagram with few modificatoins:
- The custom neural network is not a component (yet).
- There is no Kalman Filtering, since we are not infering.
- The data is saved to a local CSV File.
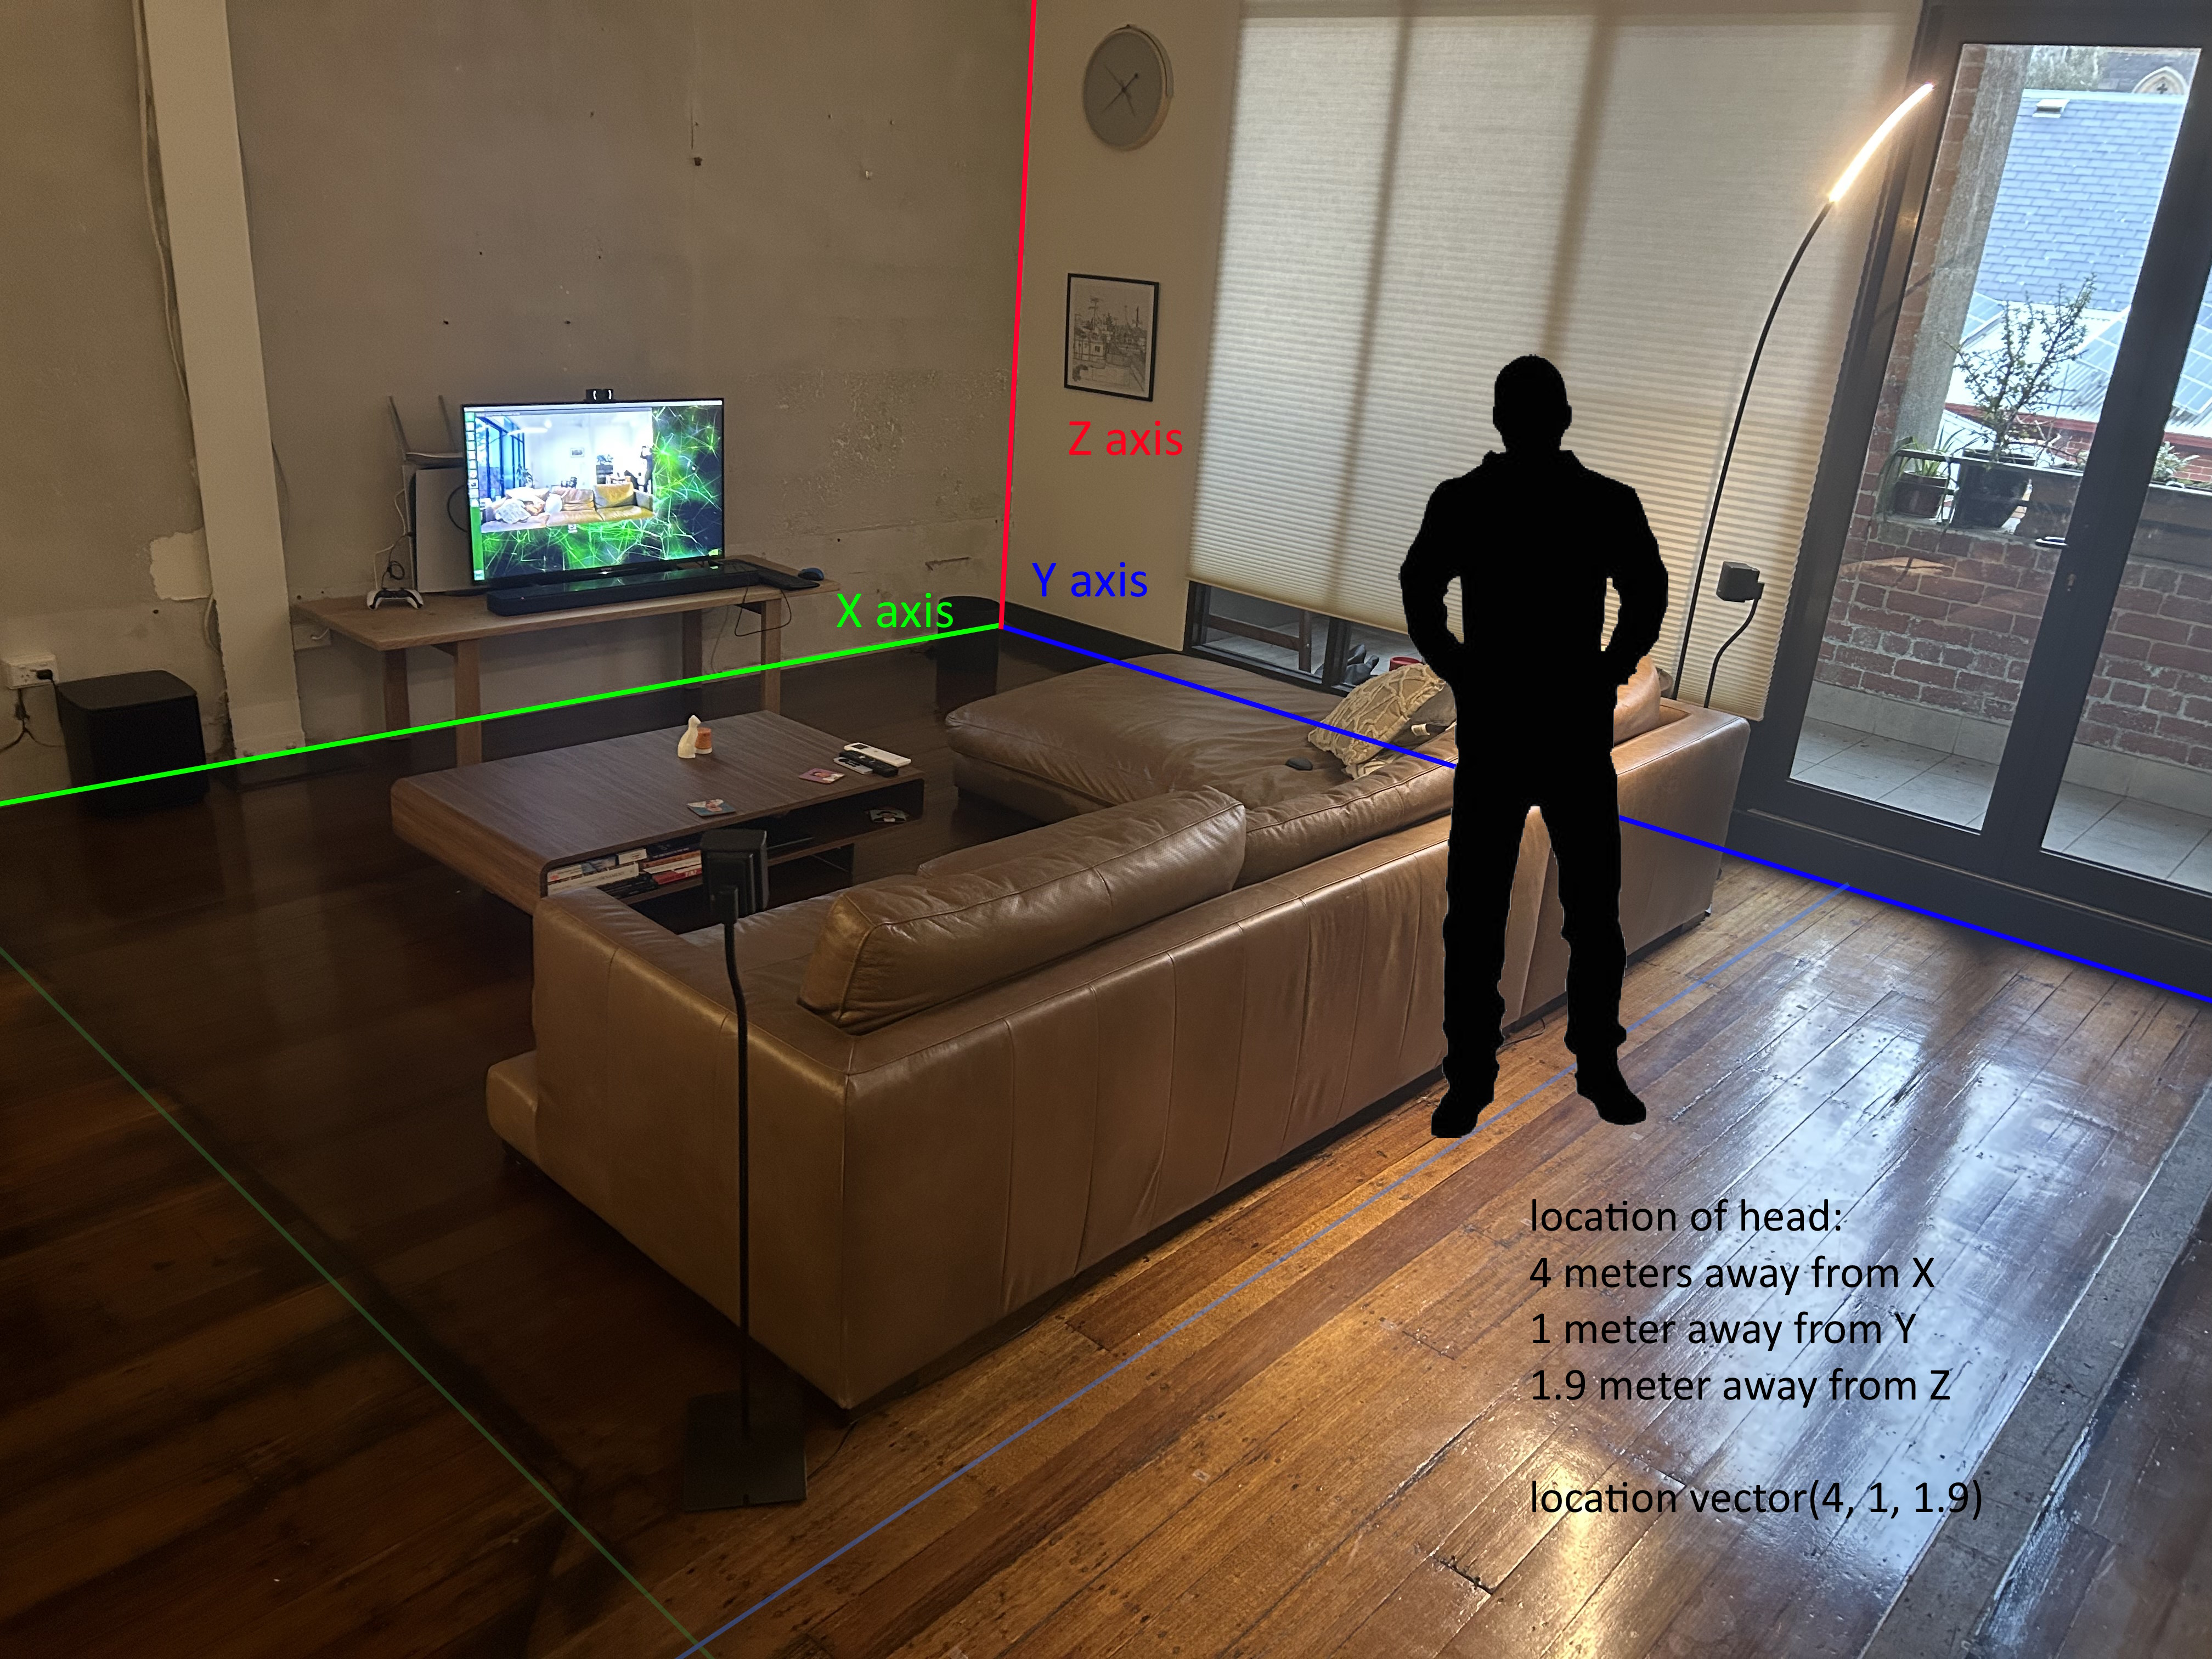
This data will play a pivotal role in constructing a neural network that takes a set of detected Body Pose KeyPoints as input and outputs precise location of the person’s head, in 3D space. Given that the application is designed solely for my personal use, I lock the z view to a fixed height of 190 cm (my height).
I had to create a physical grid - on the floor - composed of stickers that are first 1 meters apart (and at a later stage, 50 cms apart), where the grid’s point of origin is the same as the room’s origin. I used good old tape for this practice.
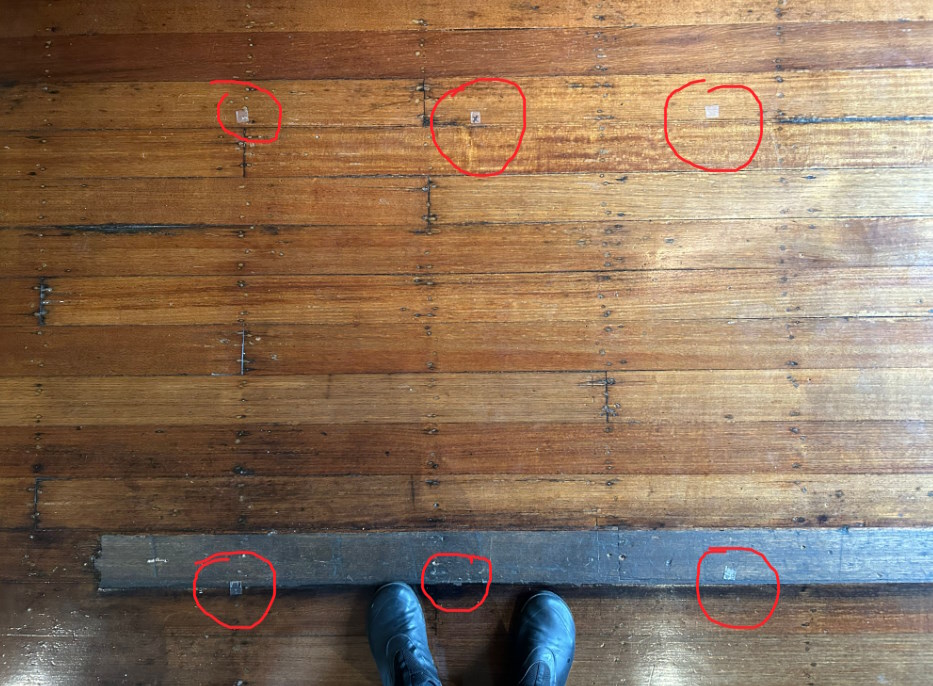
The collection of training data was pretty simple: I would stand on each of these markers, and visit a webpage published by FastAPI which asked me to specify which marker I was standing on (by means of filling in two text boxes in a webpage, X and Y distance from the walls respectively). I would enter these values, press a Button, and wait for around 1 minute, during which the camera would take ~50 images of me, calculate features, and store them (in addition to the ground truth labels which I entered in the web page) in a CSV file. I now had the data that I will use to build my custom neural network.

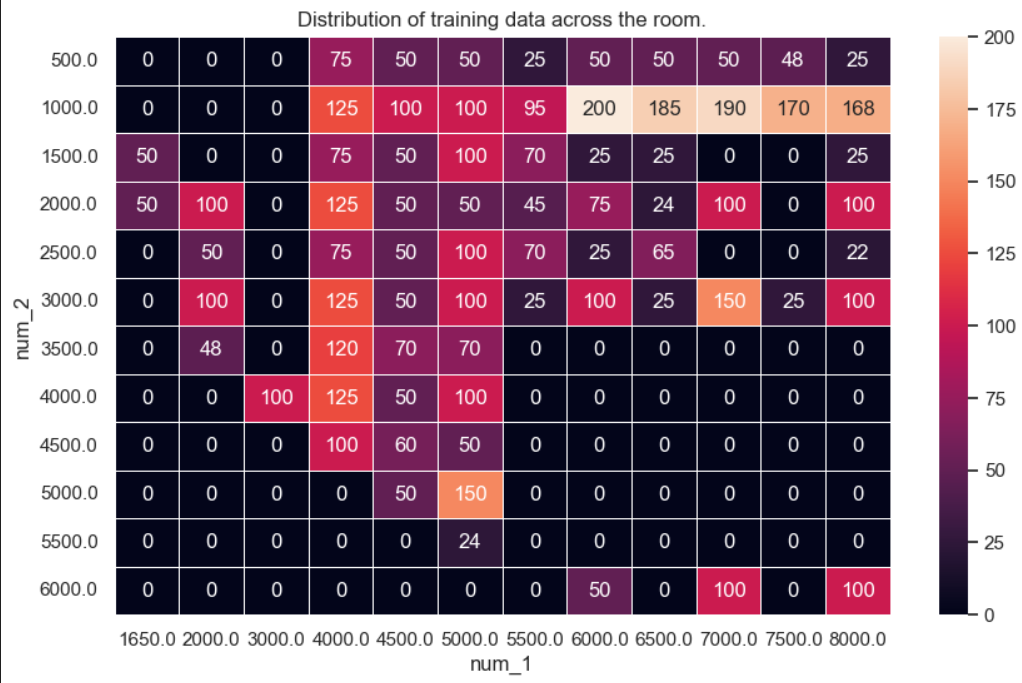
I took a total of 5500 images, wearing different clothes, moving a little bit while listening to music, and at different times of the day - in an attempt to diversify the data as much as possible. By incorporating these variations, the dataset encompasses a realistic representation of different scenarios and conditions, enabling the network to generalize and adapt to varying circumstances.
Data collection is an iterative process - and the data that I had collected was not properly distributed, as seen in the heatmap below.
Calculating features
Processing the raw data to extract features can help the Neural network converge faster. To extract meaningful features for my network, I extracted the 18 Keypoints generated by PoseNet. Focusing on symmetric keypoints, which have corresponding “left” and “right” components (such as left_eye, right_eye, left_shoulder, right_shoulder, etc.), I computed three crucial metrics for each:
- The pixel distance between the left and right keypoints, providing insights into the relative spatial positioning.
- the Center: I determined the center location of each symmetric keypoint, offering a reference point for further analysis.
- Tilt: Lastly, I derived the angular tilt of each symmetric keypoint, enabling a deeper understanding of the body pose and its orientation. By incorporating these calculated features, my network gains a comprehensive understanding of the viewer’s body positioning, enhancing the accuracy and realism of the 3D display experience. Additionally, it “learns” that being at a specific distance to the TV does not necessarily mean ‘looking at the TV’.
Building a custom Neural Network to map 2D (webcam view) to 3D (location of my head, in the room)
Determining the architecture of the networks was an interesting exercise, and felt a bit arbitrary. The network is a simple MLP built on Pytorch and trained on my laptop. Omitting batch size, the network takes in 30 features per frame, and maps those to two ground truths (X, and Y). Z was not required, as it was fixed at 190 cms. All values were scaled linearly to fit a range of [0, 1]. a 10-e3 learning rate is used with ADAM, and the network calculates loss according to a simple MAE calculation.
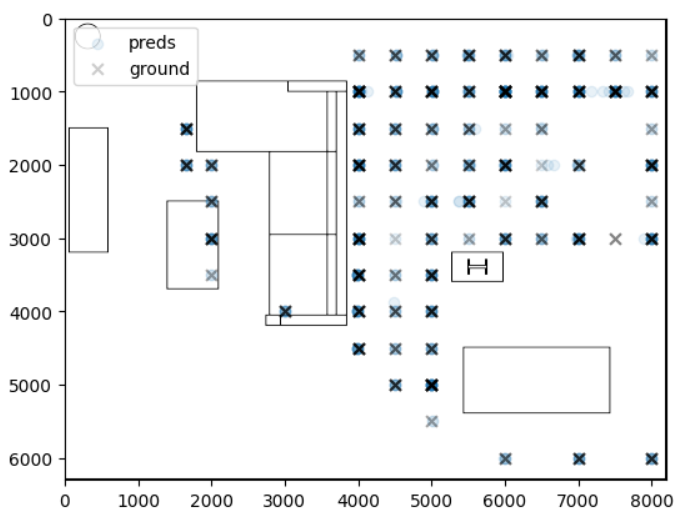
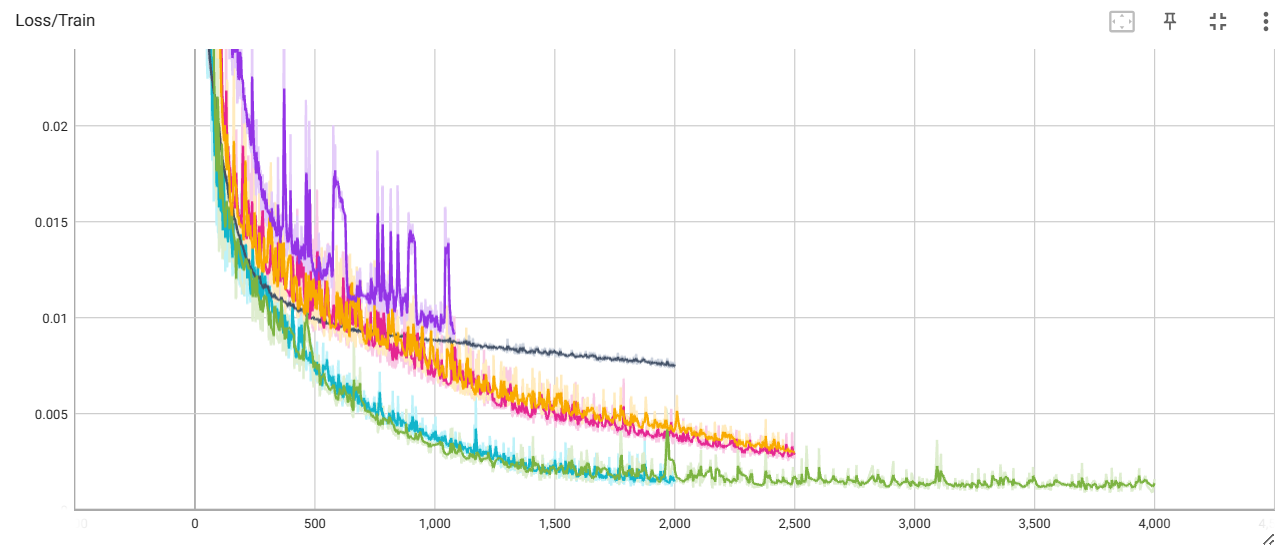
I try to counterbalance massive overfitting by creating a simple Generator on my dataset on top of the data. The generator adds up to 1 Pixel of noise for all the features collected. I’ve also experimented with self-attention layers (with Layer Normalization, Dropout, and residual connections, but no attention heads), as well as with MLP architectures. It seems that an MLP architecture was suitable and reaches phenomenal outcomes. It is composed of 4 Linear Layers, 30 -> 2048 -> 1024 -> 64 -> 2, with Dropout interspread, and finish with a Sigmoid function.


Finding important features - PCA
WIP.
Search a Hyperparameter space for the best settings
WIP.
Creating a decoupled streaming architecture (fixing the latency problem)
the application components are very synchronous: Each time a client requests an inference, A whole waterfall process has to run (capture image, extract keypoints, extract features, estimate XYZ location in room) - and this process is CPU bound. When the unity client requests the REST API once per Frame, the code on the Nano quickly crashes after few seconds. To resolve this problem, I’ve decided to decouple request for inference, from inferring the data, by creating a memory buffer, and leveraging FastAPI’s Background_tasks. In the future, I might explore the role of other libraries, such as celery.
- A ConfigStore is a dictionary object that includes a time frequency (in my case, max 20 API calls per second). The ConfigStore has a function
is_it_time_to_process_a_new_photo()function, that returns False if less than 1/20 seconds have passed, and true otherwise.
The architecture of the application now looks as follows:
Building a Kalman Filter with Copilot
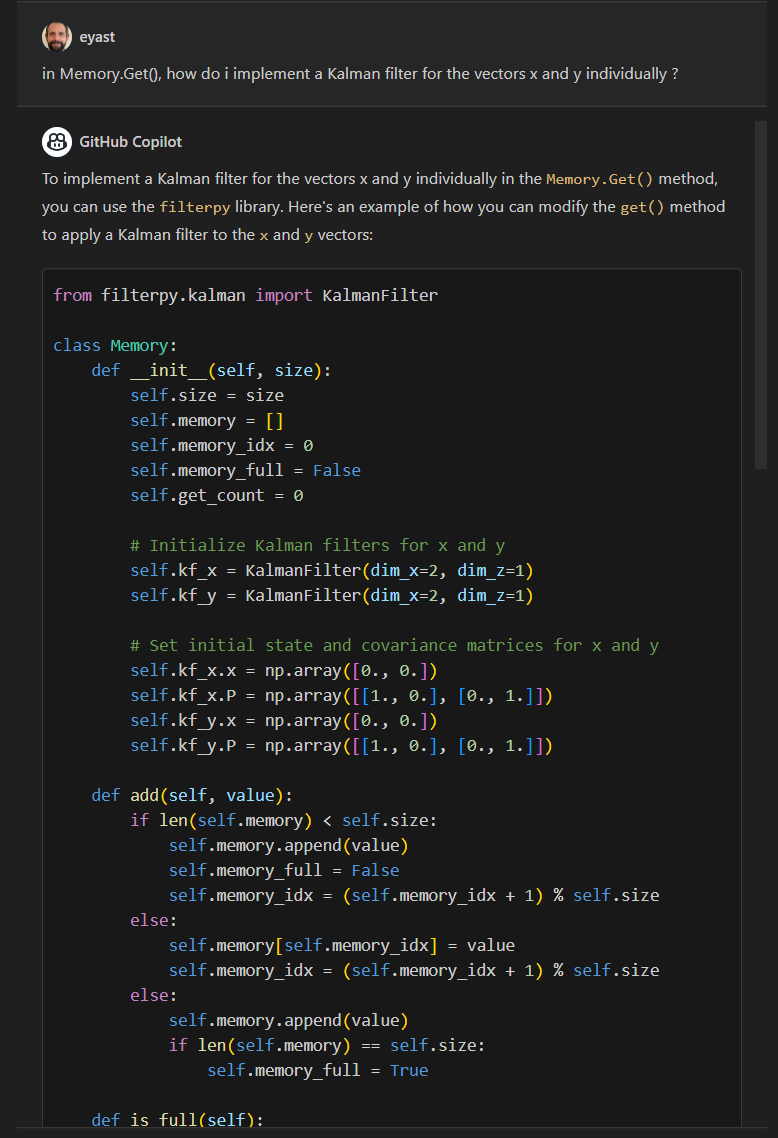
A problem that started appearing was jittering. The Neural Networks in play are all pixel-accurate, but based their estimates on a single image without necessarily taking into consideration path of motion. Sampling from this inference point at every Frame Refresh results in jittery path and therefore had to be smoothed out. This was an opportunity for me to implement a Kalman Filter, and to use Github copilot Chat for the first time. My mind was blown at how easy it was to ask for a feature correction, or addition, and the bot would yield code AND explanation.
Wrap up
Now, as I sit in awe of my living room, I am thrilled to share the fruits of my labor. What was once a conventional flat screen has been transformed into a breathtaking 3D display, capable of projecting immersive visuals that seem to leap out of the screen and into my living space. Whether I’m watching a thrilling action movie, exploring virtual worlds, or simply enjoying the beauty of nature documentaries, the newfound depth and realism of the visuals have redefined my home entertainment experience.